|
|
 |

 |
 |
 |
|
Instructions for online reporting |
|
| | |
|
|0| introduction | | This document is a description of the reporting mechanism. Please read through the instructions carefully before you proceed. | |1| understand report folder structure |
The folder "Report" contains: - three sections: each section consists of reporting tamplates. There is a template for each partner, where they should post their report
- that consists of all sections
- reporting cockpit where you can see the status of each section for each partner
- table 1: deliverable list
- table 2: milestones list
useful tips for navigation Use pathline to navigate
Below the main menu, the pathline is displayed. The pathline always shows you your current location on the platform. Moreover, the pathline can be used to easily navigate in the folder structure or hierarchy. In order to switch between folders simply click on the title in the plathline (e.g. "Report"). How to open your report folder
In order to open your report folder, click on "Report" in the main menu. Then, click on "Country Report Master", select the section and then the subfolder for the right partner. Quick access to your folder
Open the drop-down menu at the very top. Click on your partner name. | |2| fill out templates on the project platform | - step 1: templates
factline has created a template for each report section and project partner. The title of each template indicates the status, the section number and the partner name. Subsequently, a template title looks like this
"[status] PartnerX Section X ".
- step 2: fill out templates
Fill out the templates provided for you. In order to do so, open a template and click on "edit" next to its title.
Change the status information in the title to WIP (= work in progress). Insert your text in the text input field. The text editor allows you to format your text similar to MS Word or Open Office. As soon as you are finished, click on "next >>". Finally, click on "publish".
We strongly recommend working online at the earliest stage. You may begin by writing keywords in your templates and continue with writing full sentences.
- step 3: request feedback from coordinator
Once you have finished working on a template, you need to request feedback from the coordinator. This is done by changing the status information in the title to RFR (= ready for review).
- step 4: adapt your template according to the coordinator's feedback
The coordinator reads the text and gives feedback by adding a comment at the bottom of the text. You will be automatically notified via e-mail as soon as the coordinator has added a comment (see point 3 "e-mail notification" below). If the coordinator approves the text, change the status information in the title to FIN (= final). If the coordinator requests changes/adaptions/improvements in his comment, change the status information in the title to WIP (= work in progress) and continue with step 3. The comment function can also be used to ask the coordinator to clarify his feedback. Read through the instructions on the factline information platform on how to reply to comments.
| |3| order e-mail notification | If you order an automatic e-mail notification, you will not need to check every day whether or not the coordinator has already commented on your report. Instead, you will be informed via e-mail as soon as the coordinator has commented on your report.
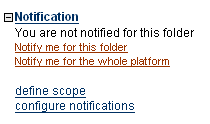
Order an automatic e-mail notification: (0) If you haven`t use Notifications yet you should define the scope first (1) Open your project partner folder and then "report".
(2) Click on "Notifiy me for this folder" in the options area (left column).

Please note: If there is no option "Notifiy me for this folder", click on "Stop notifying me for the whole platform". Now, the option should be available.
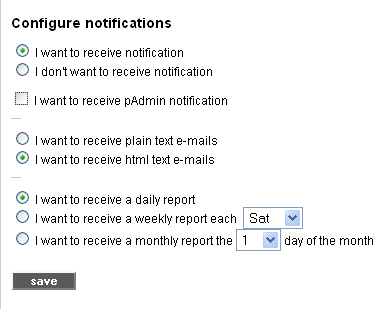
(3) Click on "configure notifications".
(4) Make sure that the settings are the same as in the figure below.

(5) Click on "save". | |4| get support if needed | If you have any questions concerning the usage of the project platform, contact Milena Staykova e-mail (milena.staykova@factline.com ). |
|
|
|
|
|
 |
|
|